Spec-Driven Development with OpenSpec: A Brief Example

When I originally started working on this post I thought it was going to be about Apache Kafka streams and how to get started with it. But over the last few weeks I’ve been working with spec-driven development using OpenSpec, and the results completely changed my perspective. The workflow is so effective for working with AI coding assistants that I decided to write about it instead.
In this post I’ll show how to use OpenSpec to drive a small project: a local Apache Kafka sever with producers and consumers in Python. The real focus is on how OpenSpec shapes the workflow and the benefits you get from it.
Source Code
The example project is available on GitHub: kafka-test including the specs generated and archived.
Spec-driven Development
Spec-driven development is the practice of writing detailed specifications before—and during—implementation, treating those specs as the source of truth for your project’s design and architecture.
💡When working with AI coding assistants, maintaining comprehensive specs in your repository ensures the AI’s context window is filled with what matters most: your project’s goals, constraints, and design decisions.
Rather than the AI inferring intent from scattered code comments or incomplete documentation, it can reference your living specifications to understand why the system works the way it does and how new changes should align with existing architecture. This fundamentally changes how effectively AI assistants can contribute to your codebase—they’re no longer just pattern-matching on code, they’re reasoning from your documented intent.
Context Window
While LLMs come with their own inherent pre-trained knowledge, what matters most for optimizing results for your specific task is the prompts you use and the context you provide. LLMs can only process so much text at once—this limit is called their context window. Since the context window isn’t endless, filling it with the most important information is crucial. OpenSpec helps by clearly documenting our current system state in specs/ and our desired state in the changes/ we define.
Claude Sonnet 4.5 has a context window of 200,000 tokens. Tokens are more than just word count; if you’re interested in learning more, check out the ChatGPT Tokenizer.
Using Other Chat Modes
You don’t need to be doing spec-driven development to benefit from optimizing your context window usage. One of the best ways to do this is to use the different modes your AI assistant offers, especially Plan mode.
Even if your AI assistant doesn’t come with different modes like Cursor does below, you can still accomplish these steps with the right prompts.
Try using the
Planmode or prompting it to make a plan before you start coding.
flowchart LR
    Ask["Ask"]
    Plan["Plan"]
    Agent["Agent"]
    Debug["Debug"]
    Ask --> Plan
    Plan --> Agent
    Agent -.-> Debug
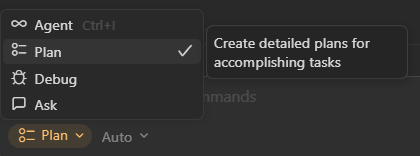 Cursor Chat Mode Options
As you work with your AI assistant, the context window fills with conversation history, code, and files—eventually pushing out older content as it reaches capacity. Many newer tools show you how much of your context window is being used.
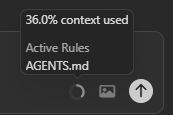 Checking Context Window Usage
Some AI assistants automatically include files like agents.md or .copilot-instructions.md in the context window depending on the tool. Keep your most important project-wide rules in these configuration files so they’re always available to the AI.
What is OpenSpec?
OpenSpec is a lightweight framework and CLI that gives you prompts and skills to be used with AI coding assistants. It treats specifications as the source of truth: by storing design specs directly in your project’s repository, they remain accessible for future modifications. While these added skills will do much of the work, the CLI will help along the way. But once you’ve completed your new change and updated your specs then your project no longer depends on the framework. This makes it easy if you ever move on from OpenSpec without any lockin.
Setup
Installing OpenSpec
The quickest way to install OpenSpec CLI is via npm:
1
npm install -g @fission-ai/openspec
There are other installation methods available—check the OpenSpec documentation for alternatives.
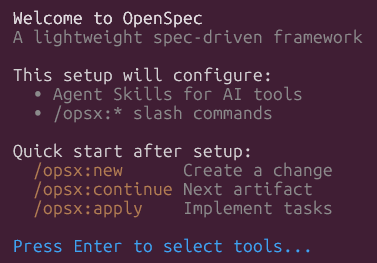
Initializing Your Project
Once installed, navigate to your project directory and run the initialization command:
1
openspec init
This creates the necessary directory structure and starter files for your specs and skills.
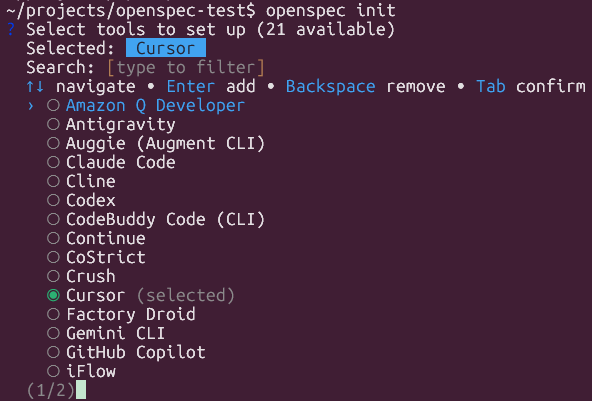 OpenSpec Init Options
The init command set up these folders with markdown files. For Cursor, these files add skills—specialized instructions that guide the AI through OpenSpec’s workflow for creating proposals, designs, and specifications.
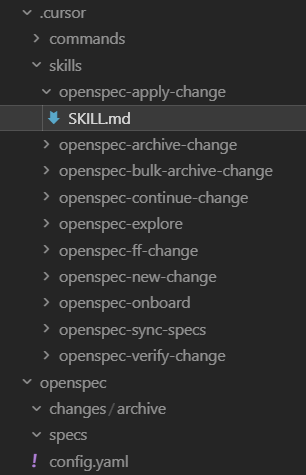 OpenSpec Skills Mardown Files
These new skills are available to use in the chat window or command line with your AI assistant. Your tool should add these to autocomplete when using / or have a skills menu in the CLI.
OpenSpec has recently updated the commands it uses, you may see /opsx commands instead.
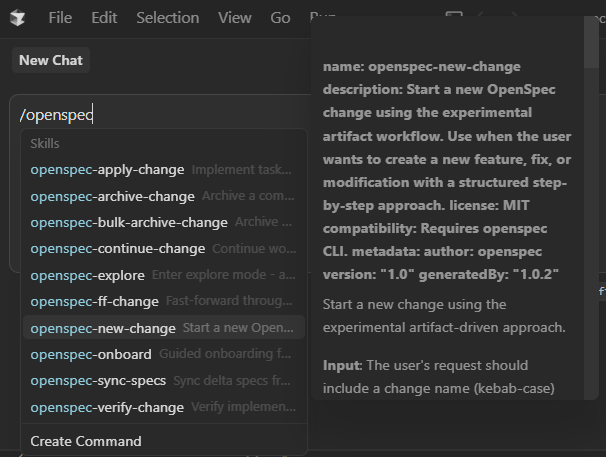 OpenSpec Skills in Chat Window
If you’re commands like above, or opsx commands, then the project has been initialized.
Folder & File Structure
To better understand what will be created, here is a brief overview of the files and folers created. Checkout the OpenSpec Getting Started page for more details.
specs/— The current specs documenting the state of the system. Each spec describes a capability (e.g. local Kafka, Python clients) with requirements and scenarios in a consistent format.changes/— Proposed deltas. A change typically has a proposal (why and what), a design (decisions and trade-offs), and a task list. When done, the change is archived so the history is preserved.changes/proposal.md— Initial proposal defining the problem and high-level approach.changes/design.md— Technical design decisions and trade-offs.changes/tasks.md— Actionable task list with completion tracking.changes/specs/spec.md— Draft specs to be merged into main specs when complete.changes/archive/— Completed change files preserving decision history.
OpenSpec Workflow
As you move through the workflow below, you are creating files that will help with filling the context window with the right content. The assistant will see the proposal, design, specs, and task list. This context is critical. It keeps the model aligned with intent and reduces drift, so implementation stays on target and the code you get is better.
This is the workflow we will follow to implement our change with OpenSpec:
flowchart TB
    newChange["/openspec-new-change"]
    proposal["proposal.md"]
    design["design.md"]
    spec["spec.md"]
    tasks["tasks.md"]
    apply["/openspec-apply-change"]
    archive["/openspec-archive-change"]

    newChange --> proposal
    proposal -->|/openspec-continue-change| design
    design -->|/openspec-continue-change| spec
    spec -->|/openspec-continue-change| tasks
    tasks --> apply
    apply --> archive

    proposal -.->|refine as needed| proposal
    design -.->|refine as needed| design
    spec -.->|refine as needed| spec
Creating Your First Change
The first change created for the example project was add-docker-compose-kafka. To do this we simply use the skill /openspec-new-change as follows.
1
/openspec-new-change add-docker-compose-kafka
We haven’t had to add any real context yet as all this has done is setup our folder structure. You should now see the openspec/changes/add-docker-compose-kafka folder with a .openspec.yaml and little else.
Now we will add a bit more context to our prompt and use the continue change skill to create our proposal.md.
1
/openspec-continue-change I want to create a project that runs a local Kafka server in docker.
We should see our propsal.md file has been created, defining our problem and high level approach to solving it.
Now is the time to be more creative. Add more context to your prompts, try including other files or projects to learn. Review your
proposal.md, see what you like and don’t like. Then ask the AI assistant to iterate over it until its correct.
Continuing the Workflow…More to come…
This should be a good start to begin using OpenSpec. While there are more details to be added here in the future, I’m not going to go through every step of the process since there are already great instructions here: OpenSpec Getting Started.
Also take a look the GitHub: kafka-test repo for the the specs I generated.
Wrapping Up
This post focused on OpenSpec and how it drives better AI assistant usage. The specs gave a single source of truth for what we wanted in our project. The change (proposal, design, tasks) made the path from idea to code explicit and traceable, and the archived change keeps an audit trail.
Benefits:
- Clarity before coding — You spell out requirements and scenarios up front, so implementation has a clear target.
- Traceability — You can trace from a scenario in a spec to the code that fulfills it, and from a task list to the files that were added or changed.
- Better alignment — Humans and AI assistants share the same reference (the specs and change docs), which reduces drift between intent and code.
- Lighter than heavy design docs — OpenSpec aims for enough structure to guide work without drowning in process. It works with Cursor, Claude Code, and other AI coding tools.
No code lives in the specs themselves. They describe what the system shall do. The code lives in the repo and is tied to the spec via the change workflow.
Next Steps
- Explore OpenSpec and spec-driven workflows for your own projects.
- Use the Confluent Python client documentation to go deeper on Kafka producers and consumers.
- Extend the example (e.g. more topics, different serialization) and document new behavior in the OpenSpec specs and a new change.
- You can run the example locally with Docker Compose and Python. No cloud account is required.